
It is affectionately said that what Oracle is to Relational Database, Cloudera is to Hadoop. Most of the Hadoop aspirants, at the beginning of their Hadoop development learning curve, fiddle with the setting up of CDH, some able to do it smoothly (Cloudera has put up an incredibly exhaustive installation guide), some requires to really sweat it out (few finer details and prerequisites are either missing or not enough emphasized upon) and very few actually gives it up losing their way in the verbose and cover-all-cases installation guide(multiple way of set up and different set of instructions for different linux OS; sometimes too much of variations for impatient starters). So there is a target audience for one more set up document which is leaner, meaner and streamlined with only one (the most preferred) variation. Try it at home!!
CDH 5.x.x Requirements
- Operating System : Ubuntu :
Precise (12.04) - Long-Term Support (LTS): 64-bit
CDH 5.3.x runs on both Trusty (14.04) and Precise (12.04) - Database :
MySQL server version 5.5 - JDK :
Oracle JDK 1.7.0_67 - Internet Protocol& Access :
Protocol: IPv4
Internet access to allow the wizard to install software packages or parcels from archive.cloudera.com
Ways of Installation
There are two ways of installations
1. Automated method using Cloudera Manager
Cloudera Manager automates the installation and configuration of CDH 5.
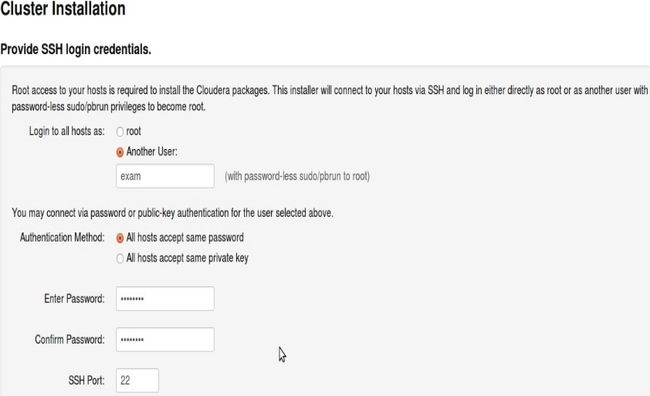
Note: Installing user to have root or password-less sudo SSH access to cluster's machines.
This is our preferred installation path and rest of the document cater to this need only
2. Manual methods:
- Download the CDH 5 1-click Install package OR Add the CDH 5 repository OR Build your own CDH 5 repository
- Deploy and install
Pre-installation steps for Installation Path 1 - Automated Installation by Cloudera Manager
a. Create new user (hduser) and group (hadoop) dedicated for Hadoop
   $ sudo addgroup hadoop
   $ sudo adduser --ingroup hadoop hduser
b. Install the SSH server and client
$sudo apt-get install openssh-client
c. Configuring passwordless SSH.
We need to configure SSH access to localhost for the hduser user
$ sudo gedit /etc/ssh/sshd_config
Note: Set PubkeyAuthentication to Yes.
$ sudo /etc/init.d/ssh reload
To generate SSH key.
    $ ssh-keygen
    $ ssh-add
To enable SSH access to local machine with this newly created key.
$ cat $HOME/.ssh/id_rsa.pub >> $HOME/.ssh/authorized_keys
To test the SSH setup.
$ ssh localhost
d. Review network config - /etc/hosts
A properly formatted /etc/hosts file should be similar to the following example:
127.0.0.1   localhost.localdomain       localhost
192.168.1.1 cluster-01.example.com      cluster-01
Use command 'hostname' and 'ifconfig' to get the hostname and ip address
e. Check if IPv6 is disabled
To check if IPv6 is enabled or disabled, from a terminal window:
$ cat /proc/sys/net/ipv6/conf/all/disable_ipv6
Note: 0 means it's enabled and 1 is disabled.
To disable IPv6
$ sudo su -
$ nano  /etc/sysctl.conf
Add these lines to sysctl.conf file
#disable ipv6
net.ipv6.conf.all.disable_ipv6 = 1
net.ipv6.conf.default.disable_ipv6 = 1
net.ipv6.conf.lo.disable_ipv6 = 1
Save sysctl.conf file with new config and Reboot your system.
f. Configuring passwordless SUDO
Important: In some Ubuntu system we don't have 'admin' group by default; instead we have a group named 'adm' (or may be something else); so make the below changes accordingly.
# Members of the admin group may gain root privileges
%adm  ALL=(ALL) NOPASSWD:ALL
And
$ sudo adduser <user> adm
If in your system you have 'admin' group, follow below steps else check out for admin group usage and replace it with adm (or whatever else group you have) group.
- Launch visudo editor which obeys vi commands
$ sudo visudo - Change this line:
# Members of the admin group may gain root privileges %admin ALL=(ALL) ALL - To this line:
# Members of the admin group may gain root privileges %admin ALL=(ALL) NOPASSWD:ALL - Launch visudo editor which obeys vi commands
# Allow members of group sudo to execute any command %sudo ALL=(ALL:ALL) ALL - Save and exit editor.
Next time you do $ sudo visudo you should see as shown below
sudoers.d
   # This file MUST be edited with the 'visudo' command as root.
   #
   # Please consider adding local content in /etc/sudoers.d/ instead of
   # directly modifying this file.
   #
   # See the man page for details on how to write a sudoers file.
   #

   Defaults        env_reset
   Defaults        mail_badpass
   Defaults      secure_path="/usr/local/sbin:/usr/local/bin:/usr/sbin:/usr/bin:/sbin:/bin"

   \# Host alias specification

   \# User alias specification

   \# Cmnd alias specification

   \# User privilege specification
    root    ALL=(ALL:ALL) ALL

   \# Allow members of group sudo to execute any command
    %sudo   ALL=(ALL:ALL) ALL

   \# Members of the admin group may gain root privileges
    %admin  ALL=(ALL) NOPASSWD:ALL

   \# See sudoers(5) for more information on "\#include" directives:

   \#includedir /etc/sudoers.d
For every user that needs sudo access WITH NO password:
   $ sudo adduser <user> admin
   $ sudo service sudo restart <user>
g. Install and Configure External Databases
Consult link (if not comfortable with below steps): Install and Configure External Databases
- Install the MySQL database
$ sudo apt-get install mysql-server - Configuring and Starting the MySQL Server
$ sudo service mysql stop - Update my.cnf so that it is similar to the below content
[mysqld] transaction-isolation = READ-COMMITTED # Disabling symbolic-links is recommended to prevent assorted security risks; # to do so, uncomment this line: # symbolic-links = 0 key_buffer = 16M key_buffer_size = 32M max_allowed_packet = 32M thread_stack = 256K thread_cache_size = 64 query_cache_limit = 8M query_cache_size = 64M query_cache_type = 1 max_connections = 550 #log_bin should be on a disk with enough free space. Replace '/var/lib/mysql/mysql_binary_log' with an appropriate path for your system and chown the specified folder to the mysql user. #log_bin=/var/lib/mysql/mysql_binary_log #expire_logs_days = 10 #max_binlog_size = 100M # For MySQL version 5.1.8 or later. Comment out binlog_format for older versions. binlog_format = mixed read_buffer_size = 2M read_rnd_buffer_size = 16M sort_buffer_size = 8M join_buffer_size = 8M # InnoDB settings innodb_file_per_table = 1 innodb_flush_log_at_trx_commit = 2 innodb_log_buffer_size = 64M innodb_buffer_pool_size = 4G innodb_thread_concurrency = 8 innodb_flush_method = O_DIRECT innodb_log_file_size = 512M [mysqld_safe] log-error=/var/log/mysqld.log pid-file=/var/run/mysqld/mysqld.pid - Ensure the MySQL server starts at boot
$ sudo chkconfig mysql on - Start the MySQL server
$ sudo service mysql start - Set the MySQL root password. In the following example, the current root password is blank. Press the Enter key when you're prompted for the root password.
  $ sudo /usr/bin/mysql_secure_installation
  [...]
  Enter current password for root (enter for none):
  OK, successfully used password, moving on...
  [...]
  Set root password? [Y/n] y
  New password:
  Re-enter new password:
  Remove anonymous users? [Y/n] Y
  [...]
  Disallow root login remotely? [Y/n] N
  [...]
  Remove test database and access to it [Y/n] Y
  [...]
  Reload privilege tables now? [Y/n] Y
  All done!
g. Installing the MySQL JDBC Driver
$ sudo apt-get install libmysql-java
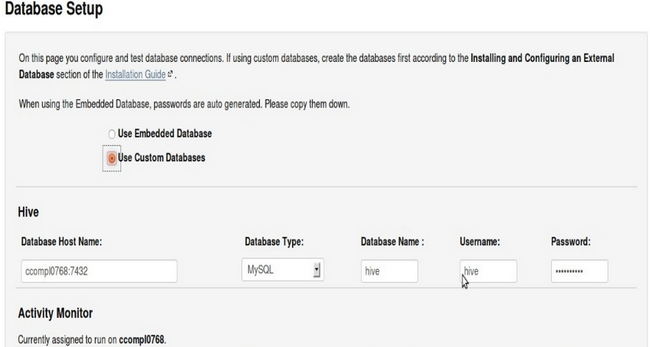
i. Creating Databases for Activity Monitor, Reports Manager, Hive Metastore Server, Sentry Server, Cloudera Navigator Audit Server, and Cloudera Navigator Metadata Server
Need to record the values you enter for database names, user names, and passwords. The Cloudera Manager installation wizard requires this information to correctly connect to these databases.
- Log into MySQL as the root user
$ mysql -u root -p - Create databases for the Activity Monitor, Reports Manager, Hive Metastore Server, Sentry Server, Cloudera Navigator Audit Server, and Cloudera Navigator Metadata Server.
Sample:mysql> create database <database> DEFAULT CHARACTER SET utf8; Query OK, 1 row affected (0.00 sec) mysql> grant all on <database>.* TO '<use>r'@'%' IDENTIFIED BY '<password>'; Query OK, 0 rows affected (0.00 sec)Role Database User Password Activity Monitor Amon amon amon_password Reports Manager Rman rman rman_password Hive Metastore Server Metastore hive hive_password Sentry Server Sentry sentry sentry_password Cloudera Navigator Audit Server Nav nav nav_password Cloudera Navigator Metadata Server Navms navms navms_password
j. Edit /etc/apt/apt.conf with property: Acquire::http::Proxy "http://server:port";
Installation steps
a. Download and Run the Cloudera Manager Server Installer
- Go to the page Download Cloudera Manager 5.3.3
- Select version and download Cloudera Express

- Change cloudera-manager-installer.bin to have executable permission
$ chmod u+x cloudera-manager-installer.bin - Run the Cloudera Manager Server installer.
$ sudo ./cloudera-manager-installer.bin - Do follow simple GUI instructions
When the installation completes, the complete URL provided for the Cloudera Manager Admin Console, including the port number, which is 7180 by default.

b. Start and Log into the Cloudera Manager Admin Console
In a web browser, enter http://Server host:7180, where Server host is the fully-qualified domain name or IP address of the host where the Cloudera Manager Server is running. Log into Cloudera Manager Admin Console. The default credentials are: Username:admin Password:admin
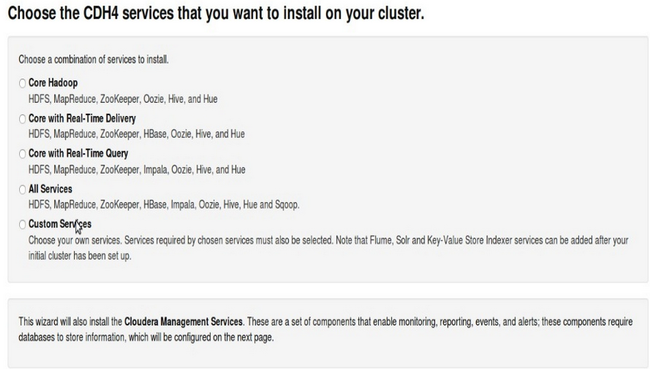
c. Use the Cloudera Manager Wizard for Software Installation and Configuration
Cloudera Manager installation wizard will do an initial installation and configuration. There is one UI for each of the blow tasks. The wizard lets you:
- Select the version of Cloudera Manager to install.
- Find the cluster hosts you specify via hostname and IP address ranges.
To enable Cloudera Manager to automatically discover hosts on which to install CDH and managed services, need to enter the cluster hostnames or IP addresses. You can also specify hostname and IP address ranges. For example:10.1.1.[1-4] --> 10.1.1.1, 10.1.1.2, 10.1.1.3, 10.1.1.4 host[1-3].company.com --> host1.company.com, host2.company.com, host3.company.com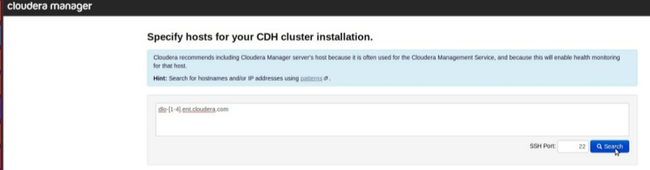
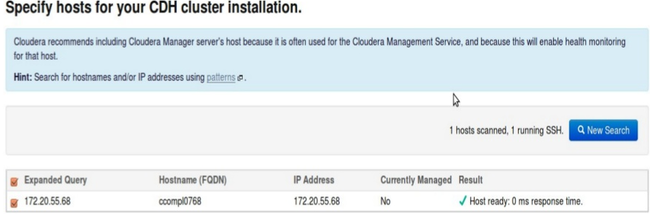
- Connect to each host with SSH to install the Cloudera Manager Agent and other components
- Optionally installs the Oracle JDK on the cluster hosts if not pre-installed
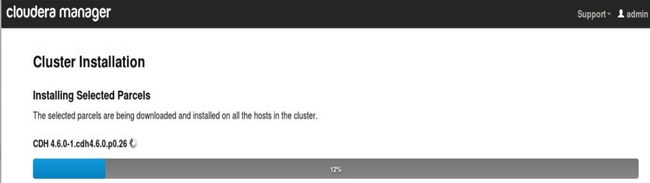
- Install CDH and managed service packages or parcels.
Need to select the repository type to use for the installation: parcels or packages.
Repository Type: parcels
Benefit: parcels provide a mechanism for upgrading the packages installed on a cluster from within the Cloudera Manager Admin Console with minimal disruption.
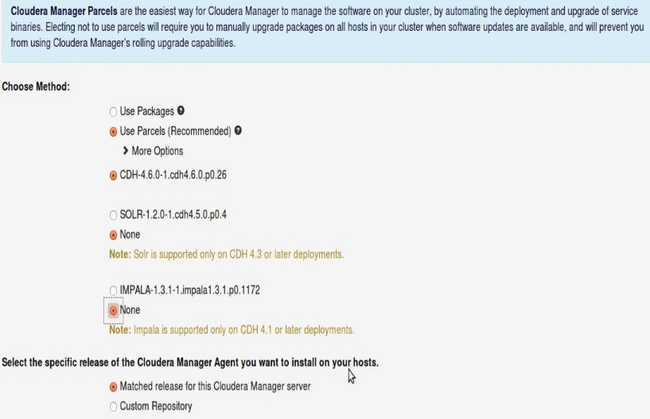

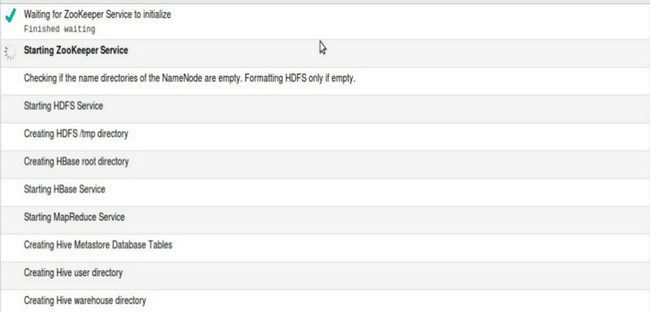
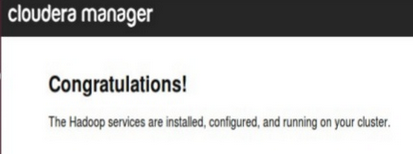
Above figures are indicative. For example Cloudera search is included in CDH 5.x, SOLR might be included in CDH distribution itself. - Configure CDH and managed services automatically and start the services.


Uninstall Cloudera
If you have come to this procedure because your installation did not complete successfully, and you want to proceed with the installation, do the following:
- Remove files and directories
$ sudo rm -Rf /usr/share/cmf /var/lib/cloudera* /var/cache/yum/cloudera* - Run the installer again
Caution: If you need to rerun the installer file (.bin) it may get locked. UI of installer will then wait forever to get the required file system locks before actual installation. You need to delete the lock files.
Comments