By default, ESP8226 module comes with AT Firmware. In this post, we'll see how to flash MicroPython firmware onto an ESP8266 ESP-12E chip using esptool.
Tools,Technologies and Components used in this article
- ESPlorer IDE
- MicroPython
- macOS Sierra
- Components:
- ESP8266 ESP-12E
- USB To TTL converter UART module (CH340)
- Breadboard
- 3.3v Breadboard Power Supply
- Breadboard Jumper Wires
- 10k Resistors - 4
- Push Button Switch - 2
- 1uF Capacitor - 1
What is ESP8266?
The ESP8266 is a low-cost Wi-Fi chip with full TCP/IP stack and MCU (Micro Controller Unit) capability produced by Shanghai-based Chinese manufacturer, Espressif Systems.
What is MicroPython?
MicroPython is a lean and efficient implementation of the Python 3 programming language that includes a small subset of the Python standard library and is optimised to run on microcontrollers and in constrained environments.
1. Install esptool.py
a. Install pip (Python Package Management System)
macpro:~ abhijit$ sudo easy_install pip
Password:
Searching for pip
Reading https://pypi.python.org/simple/pip/
Best match: pip 9.0.1
Downloading https://pypi.python.org/packages/11/b6/abcb525026a4be042b486df43905d6893fb04f05aac21c32c638e939e447/pip-9.0.1.tar.gz#md5=35f01da33009719497f01a4ba69d63c9
Processing pip-9.0.1.tar.gz
Writing /tmp/easy_install-fvgzsg/pip-9.0.1/setup.cfg
Running pip-9.0.1/setup.py -q bdist_egg --dist-dir /tmp/easy_install-fvgzsg/pip-9.0.1/egg-dist-tmp-njVa_l
/System/Library/Frameworks/Python.framework/Versions/2.7/lib/python2.7/distutils/dist.py:267: UserWarning: Unknown distribution option: 'python_requires'
  warnings.warn(msg)
warning: no previously-included files found matching '.coveragerc'
warning: no previously-included files found matching '.mailmap'
warning: no previously-included files found matching '.travis.yml'
warning: no previously-included files found matching '.landscape.yml'
warning: no previously-included files found matching 'pip/_vendor/Makefile'
warning: no previously-included files found matching 'tox.ini'
warning: no previously-included files found matching 'dev-requirements.txt'
warning: no previously-included files found matching 'appveyor.yml'
no previously-included directories found matching '.github'
no previously-included directories found matching '.travis'
no previously-included directories found matching 'docs/_build'
no previously-included directories found matching 'contrib'
no previously-included directories found matching 'tasks'
no previously-included directories found matching 'tests'
creating /Library/Python/2.7/site-packages/pip-9.0.1-py2.7.egg
Extracting pip-9.0.1-py2.7.egg to /Library/Python/2.7/site-packages
Adding pip 9.0.1 to easy-install.pth file
Installing pip script to /usr/local/bin
Installing pip2.7 script to /usr/local/bin
Installing pip2 script to /usr/local/bin

Installed /Library/Python/2.7/site-packages/pip-9.0.1-py2.7.egg
Processing dependencies for pip
Finished processing dependencies for pip
Note: esptool requires Python (Version 2.7 or 3.4 or newer) installed in your system. If pip gives error then use pip2.
b. Install esptool
macpro:~ abhijit$ sudo pip install esptool
Password:

Collecting esptool
  Downloading esptool-1.2.1.tar.gz
Collecting pyserial>=2.5 (from esptool)
  Downloading pyserial-3.2.1-py2.py3-none-any.whl (189kB)
    100% |-----------------------| 194kB 21kB/s
Installing collected packages: pyserial, esptool
  Running setup.py install for esptool ... done
Successfully installed esptool-1.2.1 pyserial-3.2.1
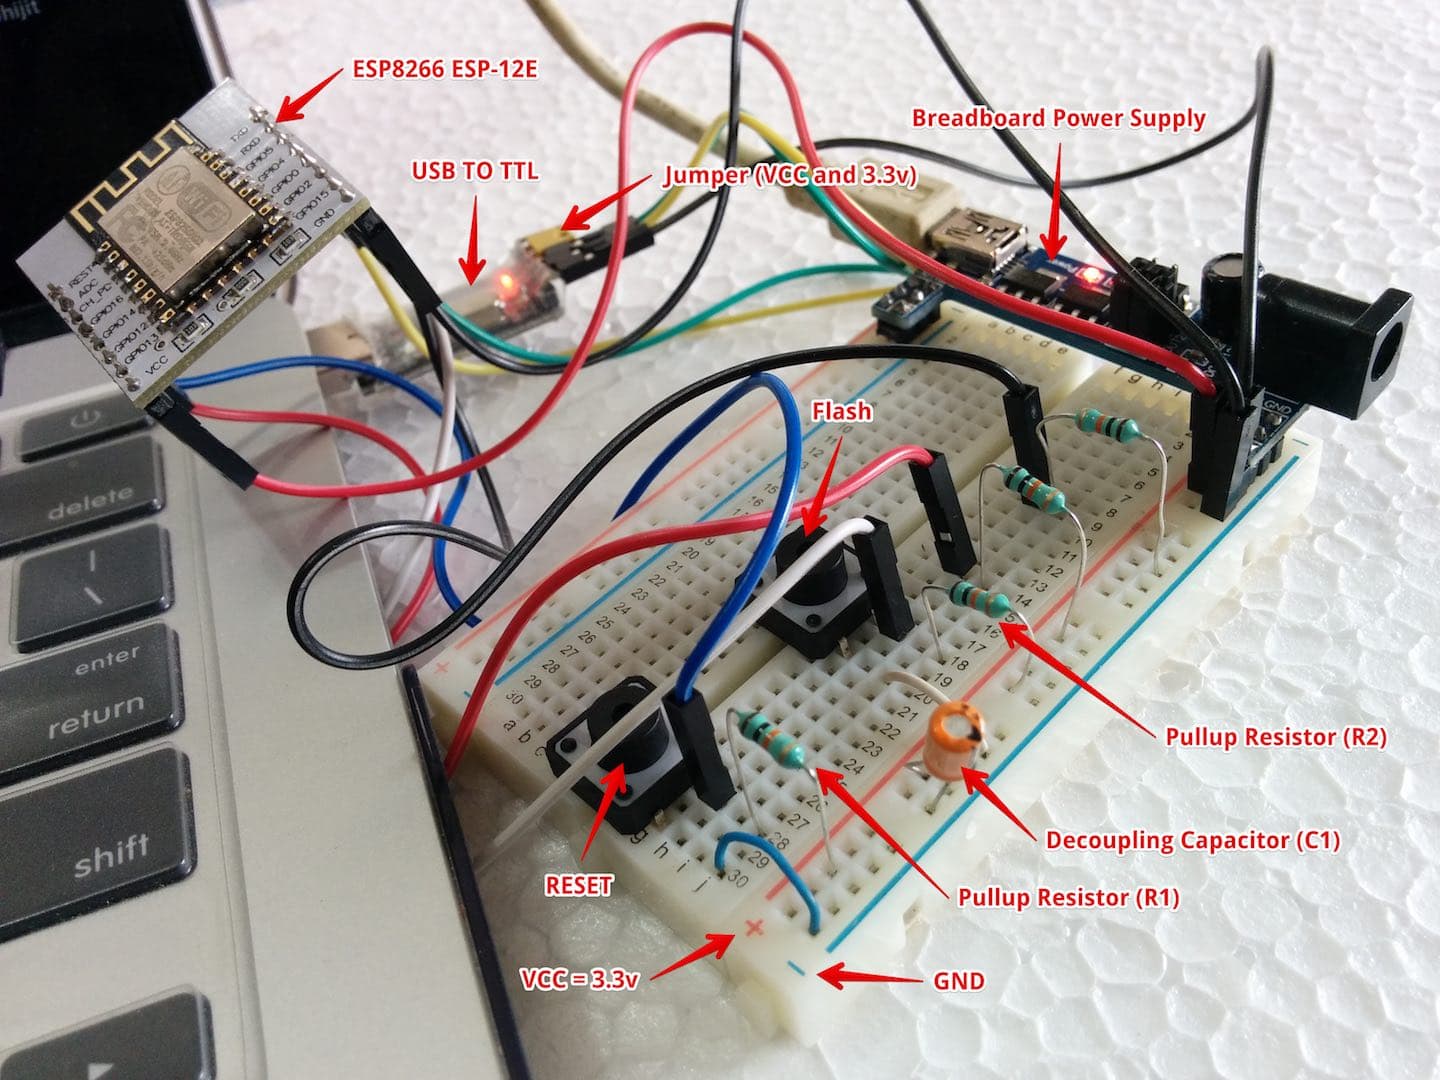
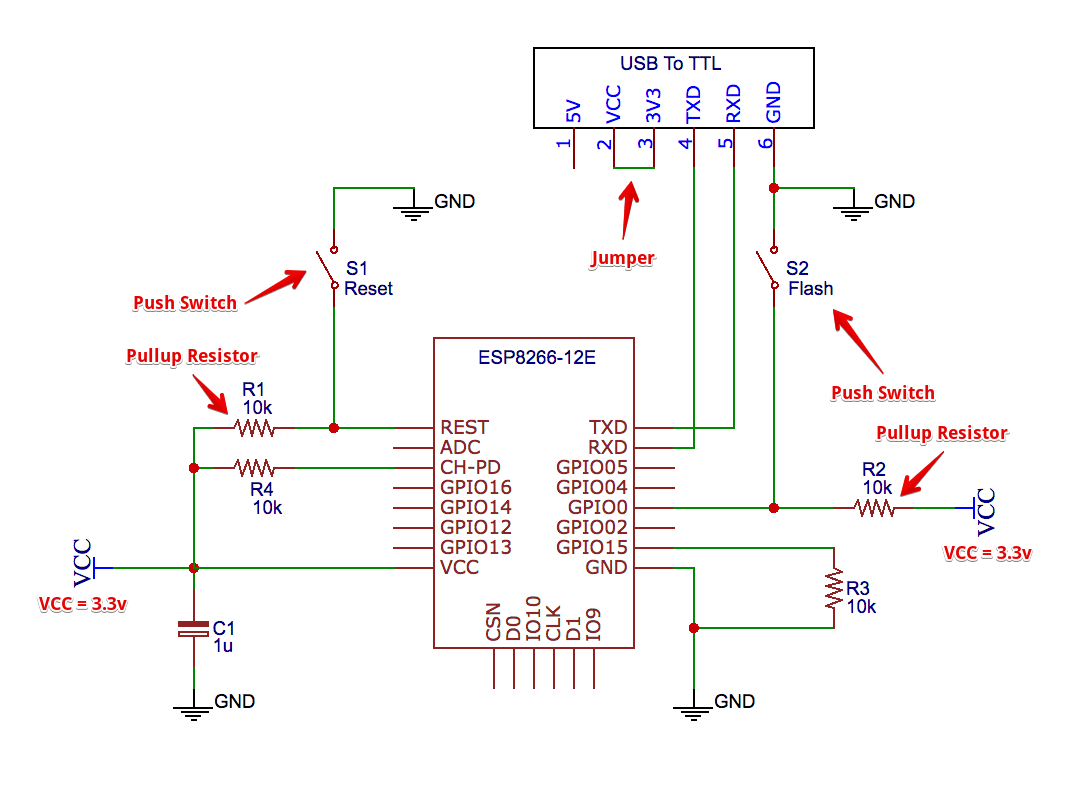
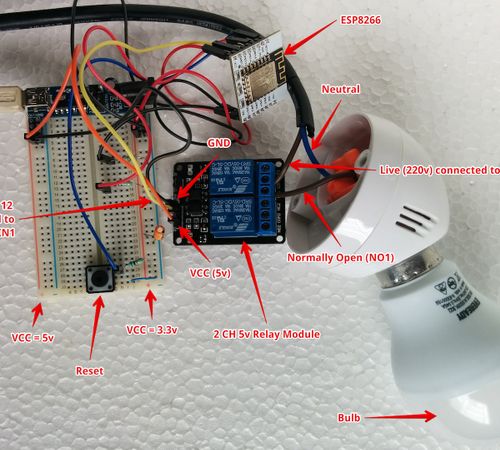
2. Build the Circuit
Connect all the components as shown in the diagram below.
Connect 3.3v TTL Serial adapter only. In case of 5v TTL serial adapter, voltage divider has to be used.
Circuit Design using Breadboard
Circuit Diagram
Note: As I have used CH340G USB to Serial (TTL) adapter in macOS Sierra, I had to Download and install the driver separately.
Pin Mode configuration
| PIN | ROM serial bootloader | Normal execution |
|---|---|---|
| CH_PD | High (VCC - 3.3v) | High (VCC - 3.3v) |
| GPIO15 | Low (GND) | Low (GND) |
| GPIO0 | Low (GND) | High (VCC - 3.3v) or Floating |
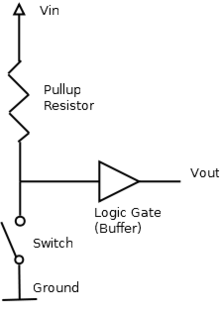
What is Pull-up resistor?
In electronic logic circuits, a pull-up resistor is a resistor connected between a signal conductor and a positive power supply voltage to ensure that the signal will be a valid logic level if external devices are disconnected or high-impedance is introduced.
3. Flash MicroPython Firmware
a. Connect the USB to Serial converter to your computer and note down the serial port. In windows, check COMx in Device Manager. Run below command for Mac OS X or Linux.
macpro:~ abhijit$ ls -l /dev/tty*
crw-rw-rw-  1 root     wheel    2,   0 27 Jan 21:36 /dev/tty
crw-rw-rw-  1 root     wheel   20,   0 15 Jan 07:46 /dev/tty.Bluetooth-Incoming-Port
crw-rw-rw-  1 root     wheel   20,  90 28 Jan 23:24 /dev/tty.wchusbserial1410
b. To see all avilable esptool commands, run esptool.py -h
macpro:~ abhijit$ esptool.py -h
usage: esptool [-h] [--port PORT] [--baud BAUD]
               {load_ram,dump_mem,read_mem,write_mem,write_flash,run,image_info,make_image,elf2image,read_mac,chip_id,flash_id,read_flash,verify_flash,erase_flash,version}
               ...

esptool.py v1.2.1 - ESP8266 ROM Bootloader Utility

positional arguments:
  {load_ram,dump_mem,read_mem,write_mem,write_flash,run,image_info,make_image,elf2image,read_mac,chip_id,flash_id,read_flash,verify_flash,erase_flash,version}
                        Run esptool {command} -h for additional help
    load_ram            Download an image to RAM and execute
    dump_mem            Dump arbitrary memory to disk
    read_mem            Read arbitrary memory location
    write_mem           Read-modify-write to arbitrary memory location
    write_flash         Write a binary blob to flash
    run                 Run application code in flash
    image_info          Dump headers from an application image
    make_image          Create an application image from binary files
    elf2image           Create an application image from ELF file
    read_mac            Read MAC address from OTP ROM
    chip_id             Read Chip ID from OTP ROM
    flash_id            Read SPI flash manufacturer and device ID
    read_flash          Read SPI flash content
    verify_flash        Verify a binary blob against flash
    erase_flash         Perform Chip Erase on SPI flash
    version             Print esptool version

optional arguments:
  -h, --help            show this help message and exit
  --port PORT, -p PORT  Serial port device
  --baud BAUD, -b BAUD  Serial port baud rate used when flashing/reading
c. Press and hold Flash button then press Reset button. Release both buttons. This will pull down GPIO0 to LOW/GND to set the mode to ROM serial bootloader.
To erase the Flash, run below command
macpro:~ abhijit$ esptool.py --port /dev/tty.wchusbserial1410 erase_flash
esptool.py v1.2.1
Connecting...
Running Cesanta flasher stub...
Erasing flash (this may take a while)...
Erase took 12.5 seconds
d. Download ESP8266 MicroPython Firmware (say esp8266-20161110-v1.8.6.bin) from http://micropython.org/download#esp8266.
e. Press and hold Flash button then press Reset button. Release both buttons.
f. Open Terminal and change the directory where you have copied the firmware. Now deploy MicroPython firmare onto ESP8266.
macpro:firmware abhijit$ esptool.py --port /dev/tty.wchusbserial1410 --baud 115200 write_flash --flash_size=detect 0 esp8266-20161110-v1.8.6.bin
esptool.py v1.2.1
Connecting...
Auto-detected Flash size: 32m
Running Cesanta flasher stub...
Flash params set to 0x0040
Writing 569344 @ 0x0... 569344 (100 %)
Wrote 569344 bytes at 0x0 in 49.4 seconds (92.2 kbit/s)...
Leaving...
Troubleshooting: If you encounter "A fatal error occurred: Invalid head of packet ('\x04')", reduce baud rate. In my case I had to reduce from 460800 to 115200.
4. Verify
To connect with REPL on ESP8266 over USB serial UART, we can use different terminal programs like picocom on Linux, screen on MAC and TeraTerm on Windows.
To verify the firmware integrity, import esp module and run esp.check_fw();. If everything is fine, then it'll print True. Otherwise you have to flash the firmware again.
For example
Last login: Fri Feb 4 11:24:52 on ttys000
macpro:~ abhijit$ screen /dev/tty.wchusbserial1410 115200
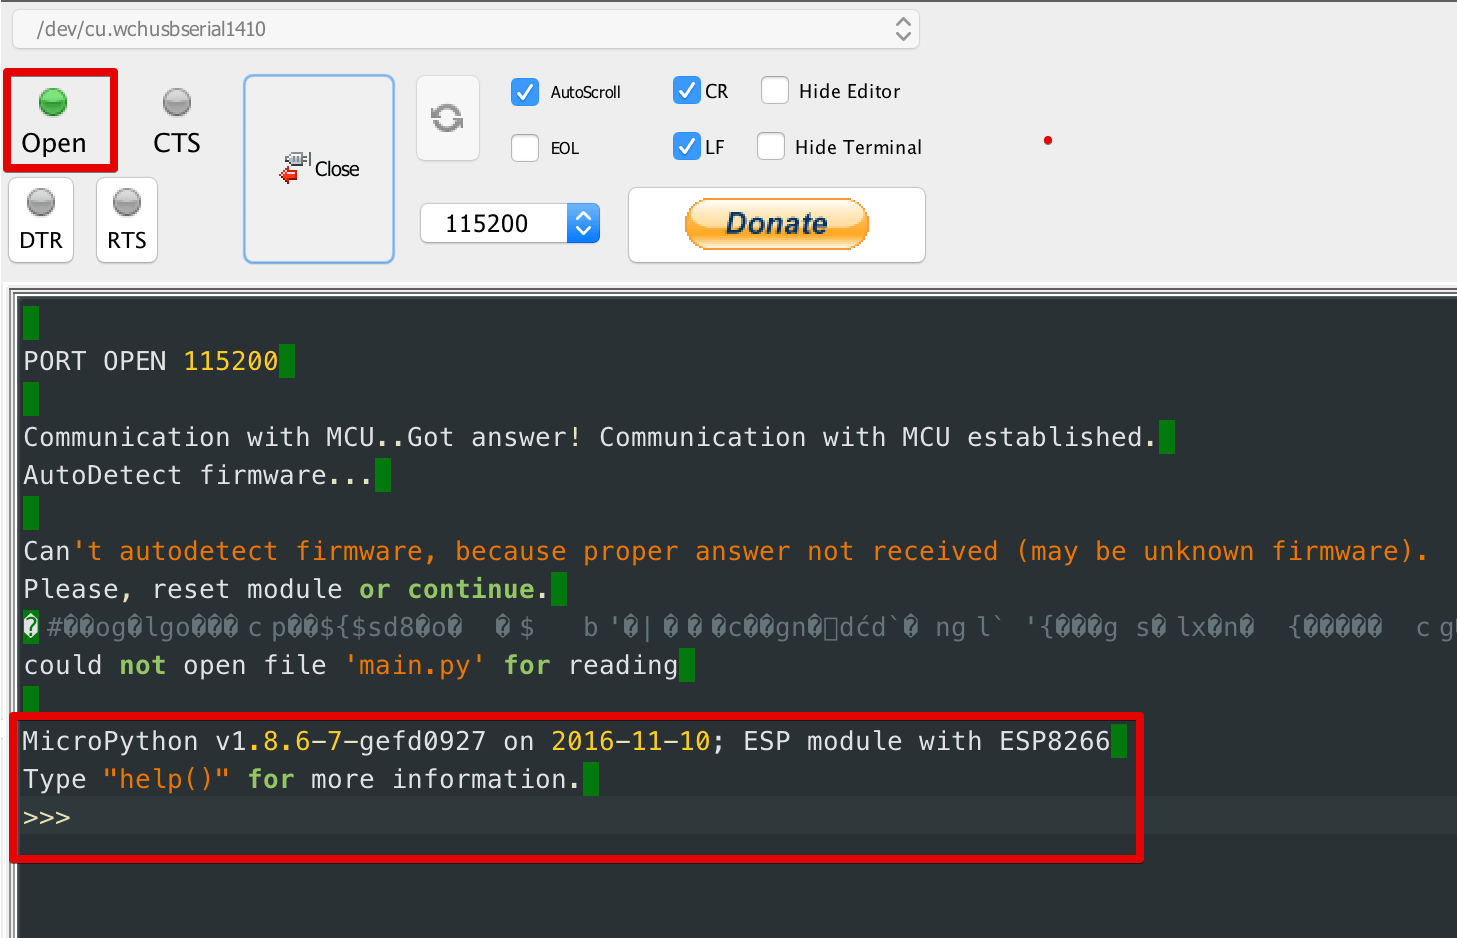
MicroPython v1.8.6-7-gefd0927 on 2016-11-10; ESP module with ESP8266
Type "help()" for more information.
>>> import esp;
>>> esp.check_fw();
size: 565964
md5: a7aba6d1b34b413abd34e17cc44c9278
True
>>> print('Hello World!');
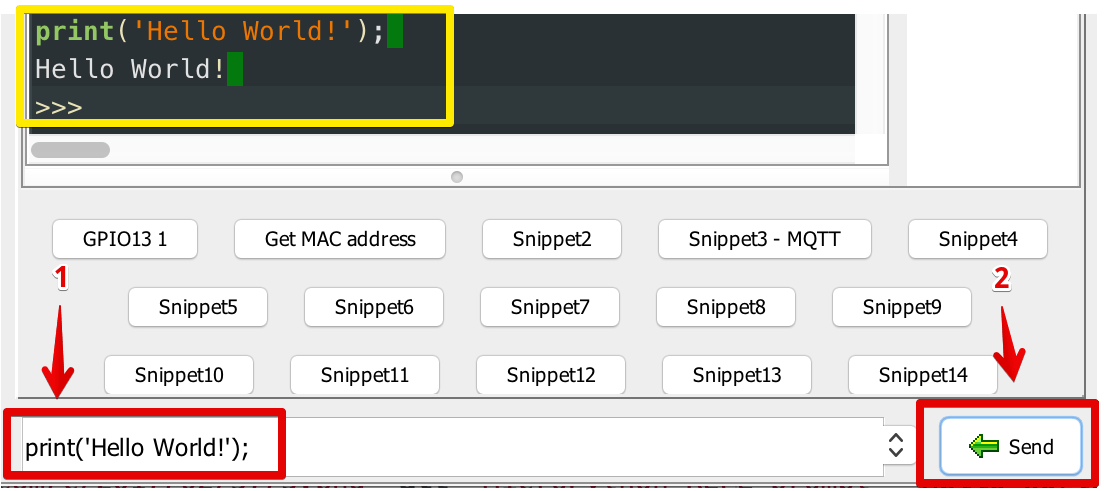
Hello World!
>>>
There are many GUI/IDE availble to communicate with ESP8226. For my convenience, I am using ESPlorer IDE for coding and deployment of programs to the chip. If you like, go through below steps to get a rough idea on the usage of ESPlorer IDE.
a. Download ESPlorer - Integrated Development Environment (IDE) for ESP8266 developers from https://esp8266.ru/esplorer/#download and unzip it.
Note: ESPlorer requires Java SE 7 or newer installed in your system.
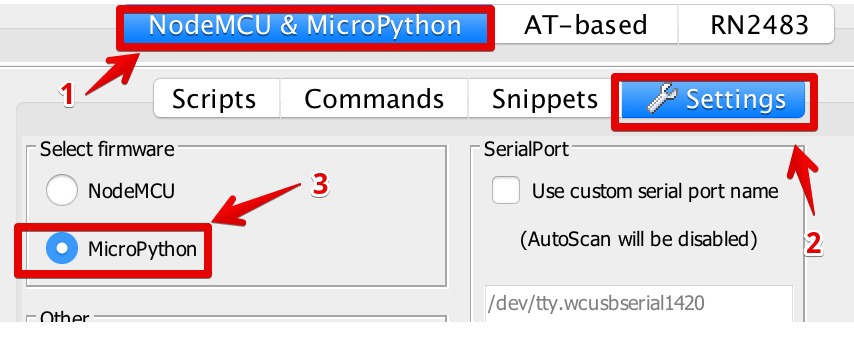
b. Open ESPlorer. Go to "NodeMCU & Micropython" --> "Settings" tab. Select firmware "MicroPython".
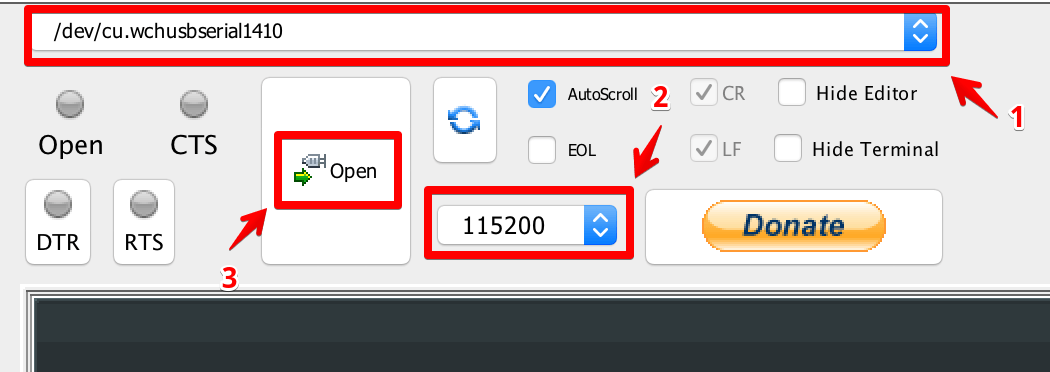
c. Select port, baud rate and click "Open" button.

d. Press reset button. Once connected, you will see MicroPython REPL prompt '>>>'
e. Send the command print('Hello World!');. This will print 'Hello World!'.


Comments