After a long day at office, wouldn't it be great to step into a cool room without having to wait for the air conditioning to start functioning? I am sure all of us has unlocked the just locked door to double check if the electrical appliances have indeed been switched off. For ones who own a personal garage, it would feel great to watch the garage door open as you drive in without having to step out of your car. So let's explore a home automation use case that would map the switching on/off of appliances with the entry/exit of a preset geofence (virtual perimeter for a real-world geographic area).
Disclaimer: If you don't have required knowledge and training to handle electric main lines, DO NOT try this on your own. Take professional help from an electrician. It might cause life-threatening electrical injuries. Thus exercise caution.
Tools,Technologies and Components used in this article :
- MicroPython
- WebREPL
- MQTT
- CloudMQTT - A globally distributed MQTT broker
- OwnTracks for Android
- Fake GPS location Android App
- Components:
- ESP8266 ESP-12E
- Breadboard
- 3.3v & 5v Breadboard Power Supply
- Breadboard Jumper Wires
- 10k Resistors - 3
- Push Button Switch - 1
- 1uF Capacitor - 1
- 5v Relay Module - 1
- Electric bulb & holder - 1
- Main lines & wires
What OwnTracks does?
The OwnTracks app runs in the background on your Android or iOS device and waits for the smart phone to tell it that the device has moved, whereupon OwnTracks sends out a message with its current coordinates. (more...)
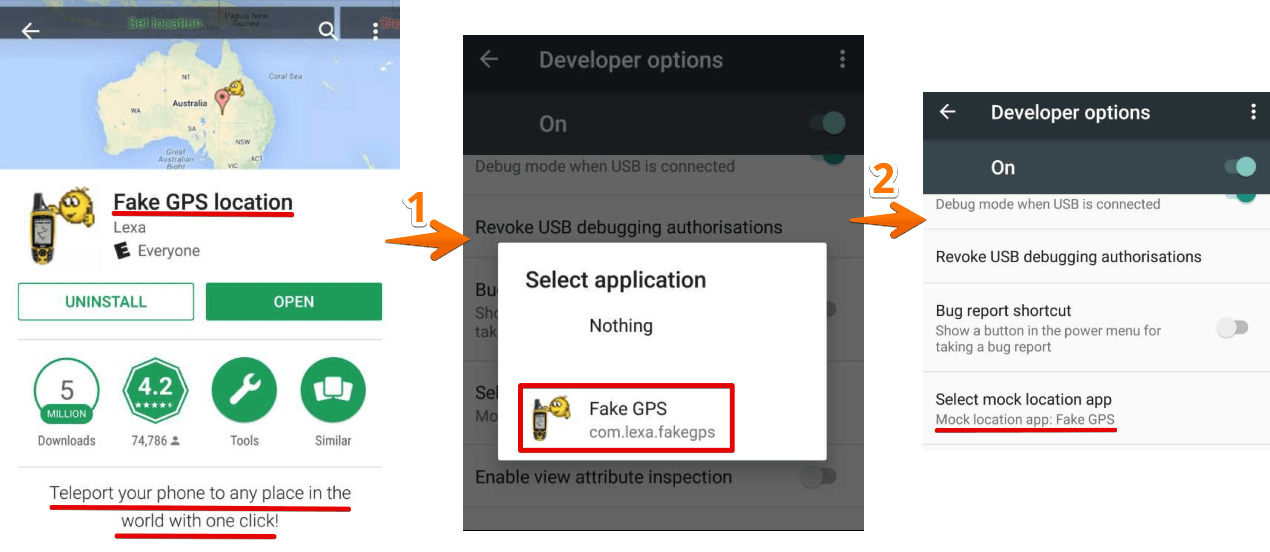
What Fake GPS location does?
Teleport your phone to any place in the world with two clicks! This app sets up fake GPS location so every other app in your phone believes you are there! (more...)
1. Prerequisite
For better understanding, I would recommend you to go through following posts.
- How to flash MicroPython firmware onto an ESP8266 ESP-12E chip using esptool?
- How to setup WebREPL to connect to Python prompt (REPL) of ESP8266 over WIFI network?
- Example: Remotely switch on/off and control brightness of an LED using MicroPython WebREPL
- Configure STA_IF interface of ESP8266 (MycroPython firmware) to connect with WIFI network automatically on boot
- Home Automation - Internet of Things - MQTT (MQ Telemetry Transport), ESP8266 and MycroPython
2. Install and configure OwnTracks app
To track current location and generate event whenever the mobile device enters or leaves a pre-defined geofence (or region), we'll use an android application, called OwnTracks.
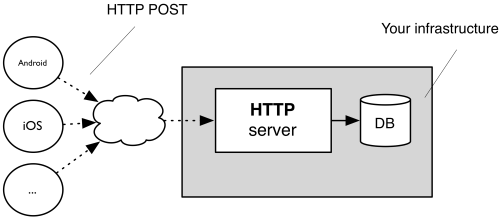
How OwnTracks works?
The OwnTracks apps run on your smart phone... When the device determines that it's moved a significant distance, it contacts a server via 3G or WiFi (hopefully one of those is available, but we queue messages many thousands on the app until connectivity can be established) and says "hey, I'm here", whereby "here" is specified with a bit more precision. This server is either a HTTP Web server or an MQTT server. This last server is called a broker and the contact is made with an open, lightweight, standardized protocol called MQTT. (If you think that's bad it isn't: the protocol you use to surf the Web is called HTTP; does that sound much better?) So the smart phone sends your location (this operation is called publish in MQTT-speak) to the broker and goes back to sleep until it realizes you've again moved a significant distance whereupon the whole procedure starts anew. This broker is ideally something you provide, but we can help you out to start with by lending you the use of ours, free of charge for a while.(more...)
Let's install and configure OwnTracks.
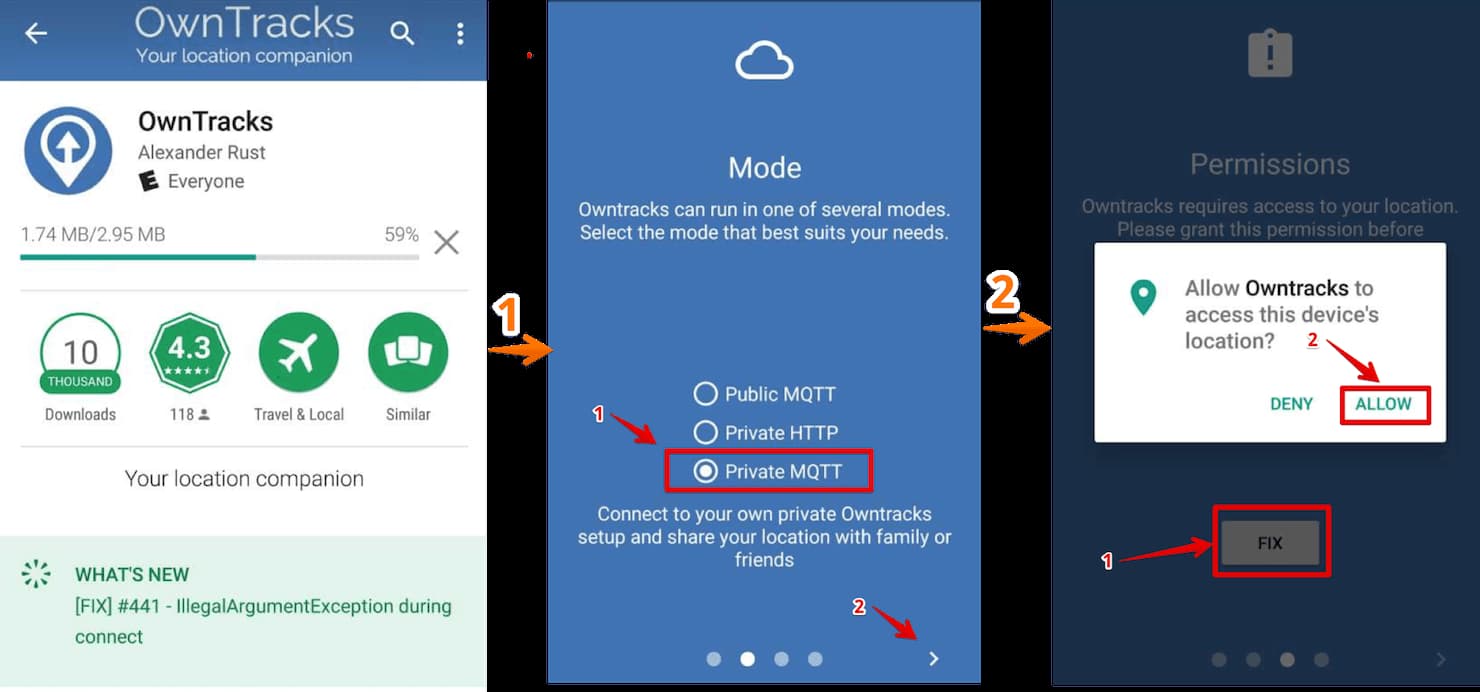
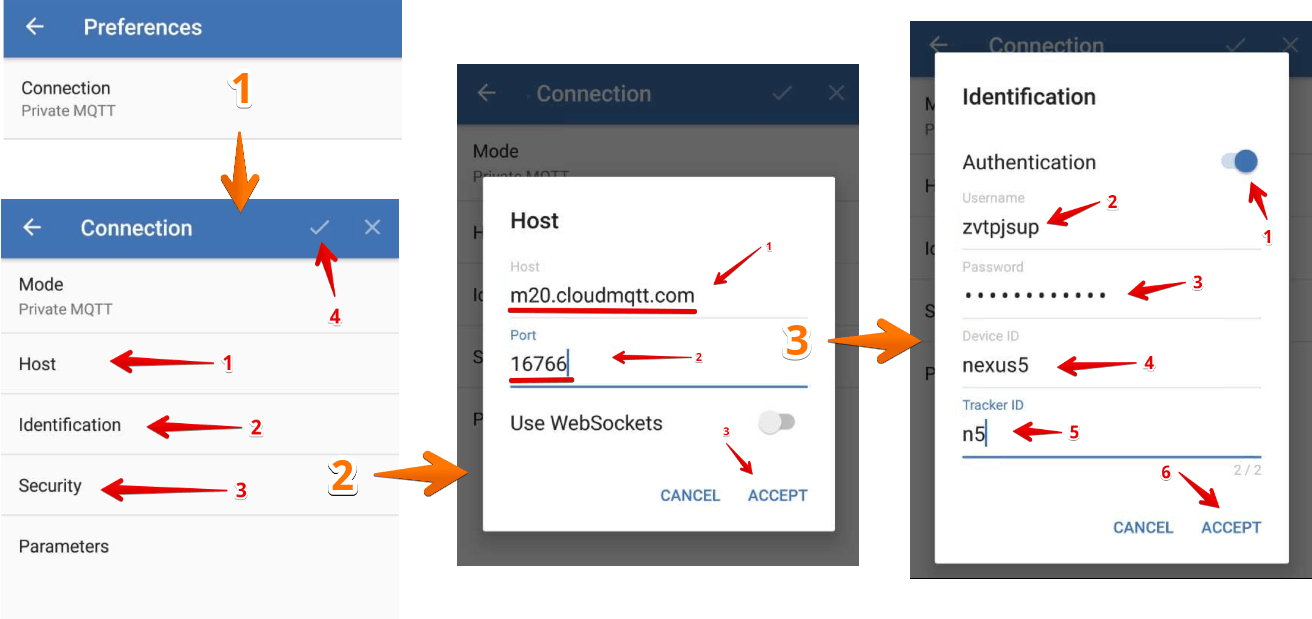
a. Open Google Play Store and install OwnTracks Android App. If you have IOS then install OwnTracks for iOS. Once installed, open the OwnTracks app. Select the mode as "Private MQTT". Give permission to access device's location.
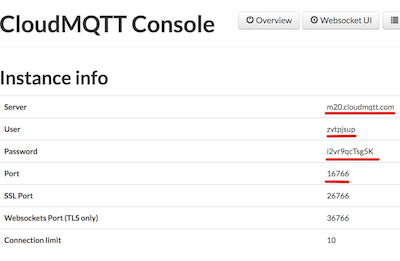
b. Login to CloudMQTT Control Panel. Note down instance info (Server, User, Password and Port) from CloudMQTT Console.
c. Use the details of CloudMQTT instance to configure a connection in "Private MQTT" mode.
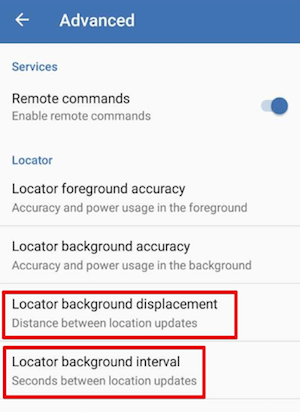
d. Update "Locator background displacement" (e.g. 100) and "Locator background interval" (e.g. 5) in "Advanced" of "Perferences".
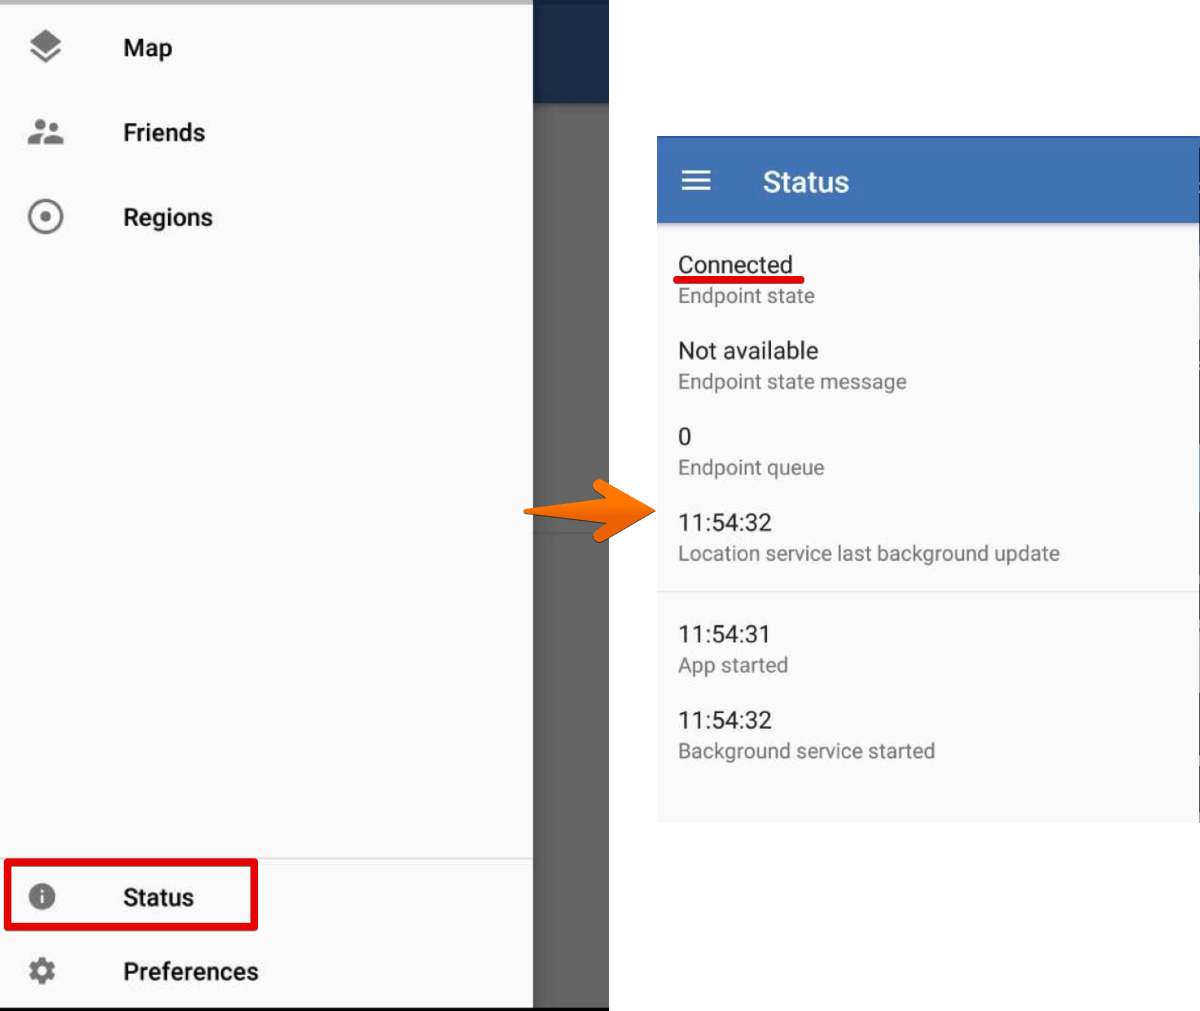
e. If everything goes well, "Endpoint state" will be "Connected".
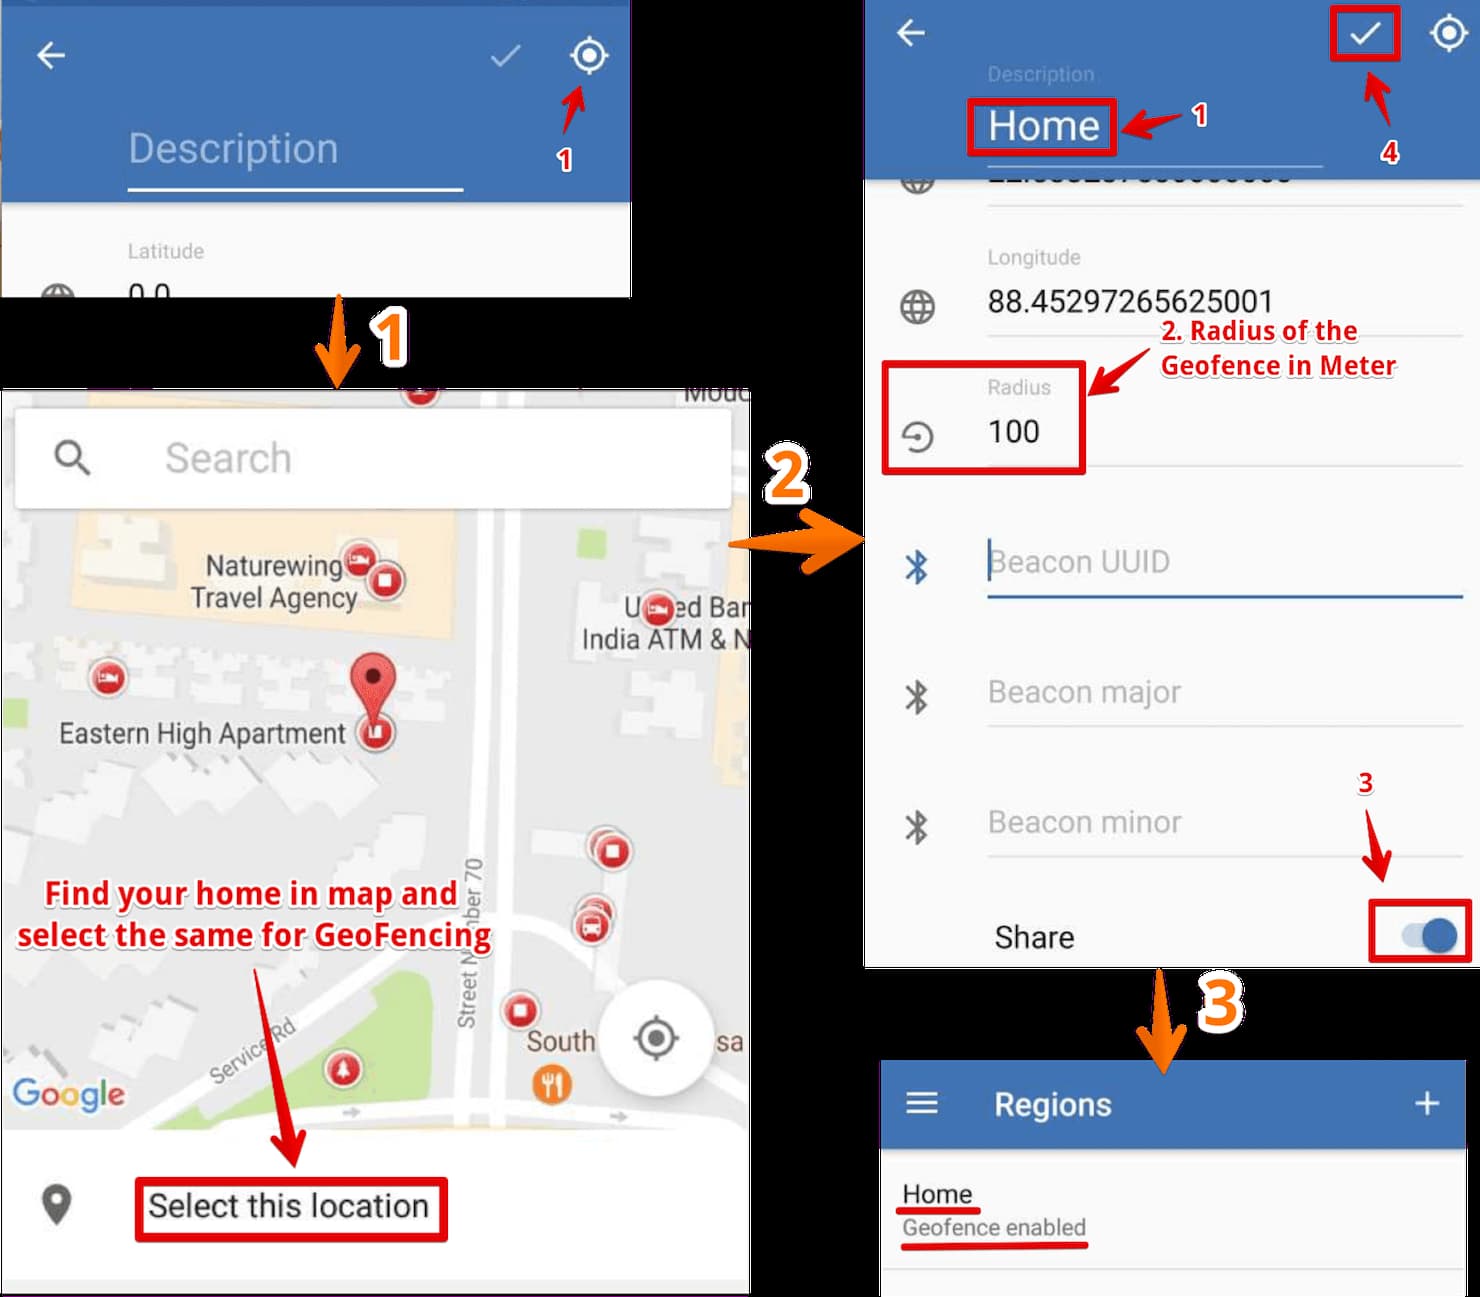
f. Open "Regions" and click the "+" sign to add a region (or waypoints).

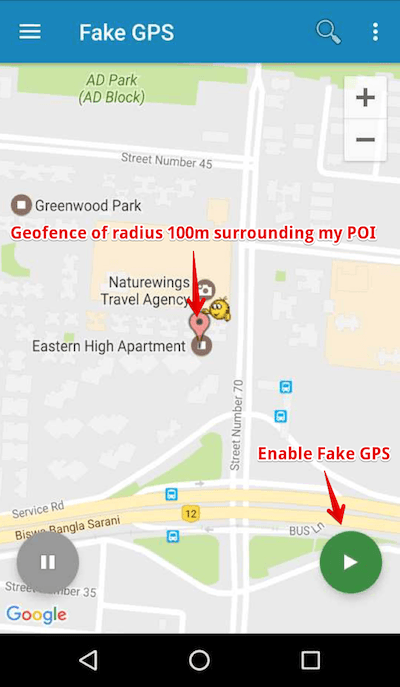
g. Select a location on the map and define the Geofence by setting a radius surrounding your point of interest. Once done, you'll see "Geofence enabled" for that region.
3. Install Fake GPS location app and configure
Being a lazy person, I always prefer to do stuff staying at the same place. Here, Fake GPS location android app perfectly fits my requirement. Basically, I'll fake the GPS location of my mobile instead of moving around in person.
a. Open Google Play Store and install Fake GPS location.
b. Goto Developer Options --> Select mock location app.
c. Choose Fake GPS as mock location app.
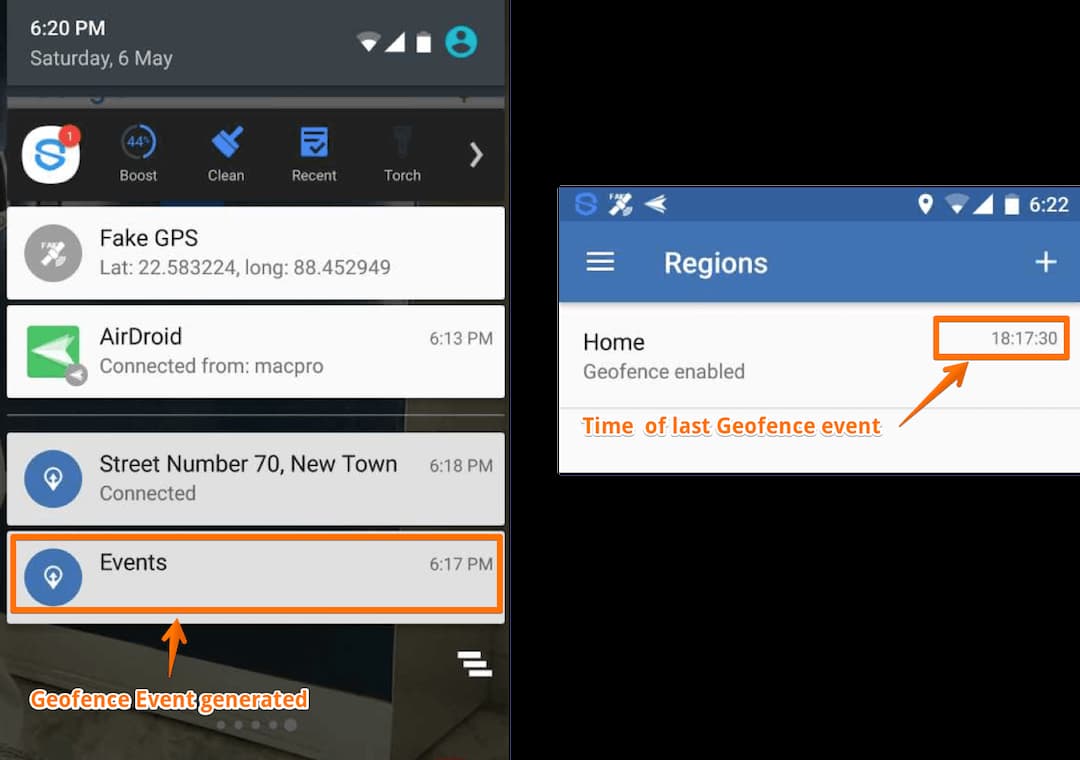
4. Verify OwnTracks and CloudMQTT communication on Geofence events
Whenever the participating mobile device enters or leaves the configured region, a Geofence event is emitted and a corresponding message is pushed to CloudMQTT by OwnTracks. In the next few steps, we'll verify this.
a. Open Fake GPS location. Go inside the configured Geofence / region. Set the mock gps location.
b. "enter" geofence event will be generated for configured "Home" region by OwnTracks.
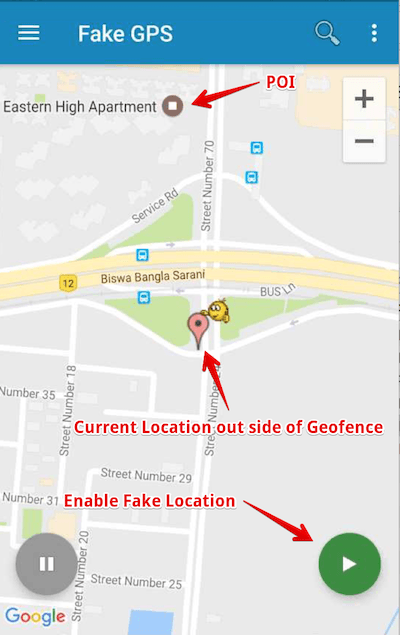
c. Similarly, if we move out of the geofence using Fake GPS location, a "leave" geofence event will be emitted.
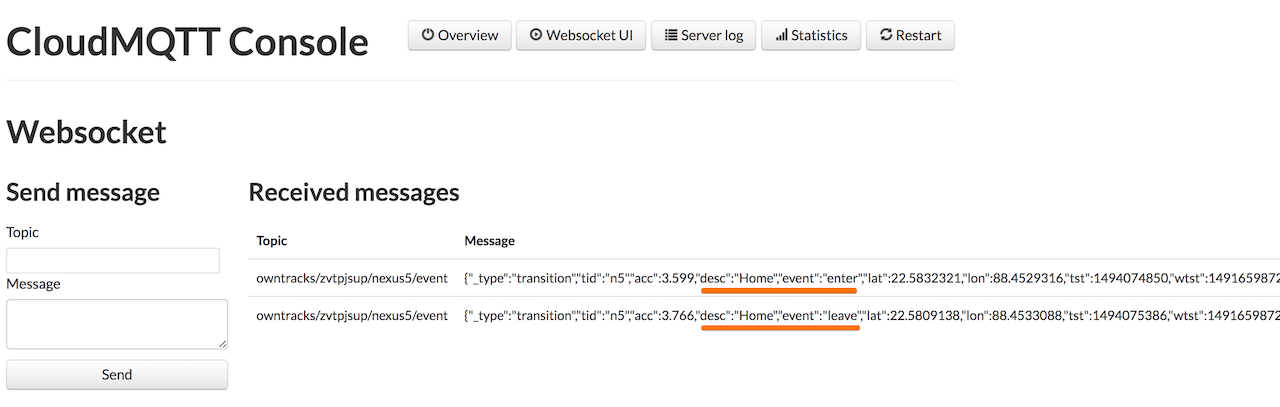
d. So far, it is confirmed that geofence "enter" and "leave" events are correctly emitted by OwnTracks. Next, we'll verify whether messages are published to CloudMQTT or not. For that, login to CloudMQTT Console and open Websocket UI. If everything goes well, we'll be able to see all the location messages published by OwnTracks app.
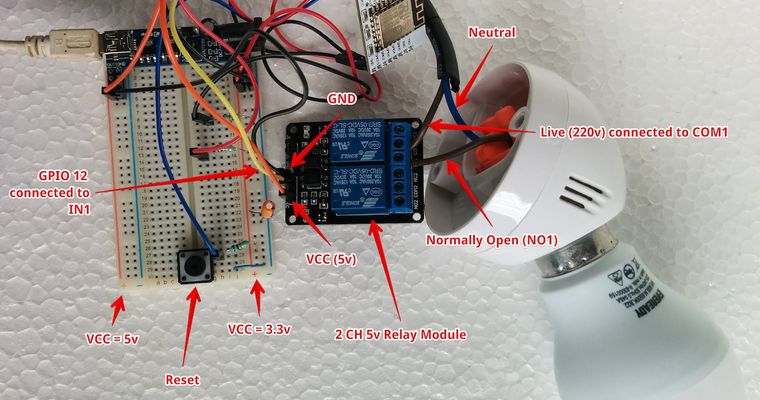
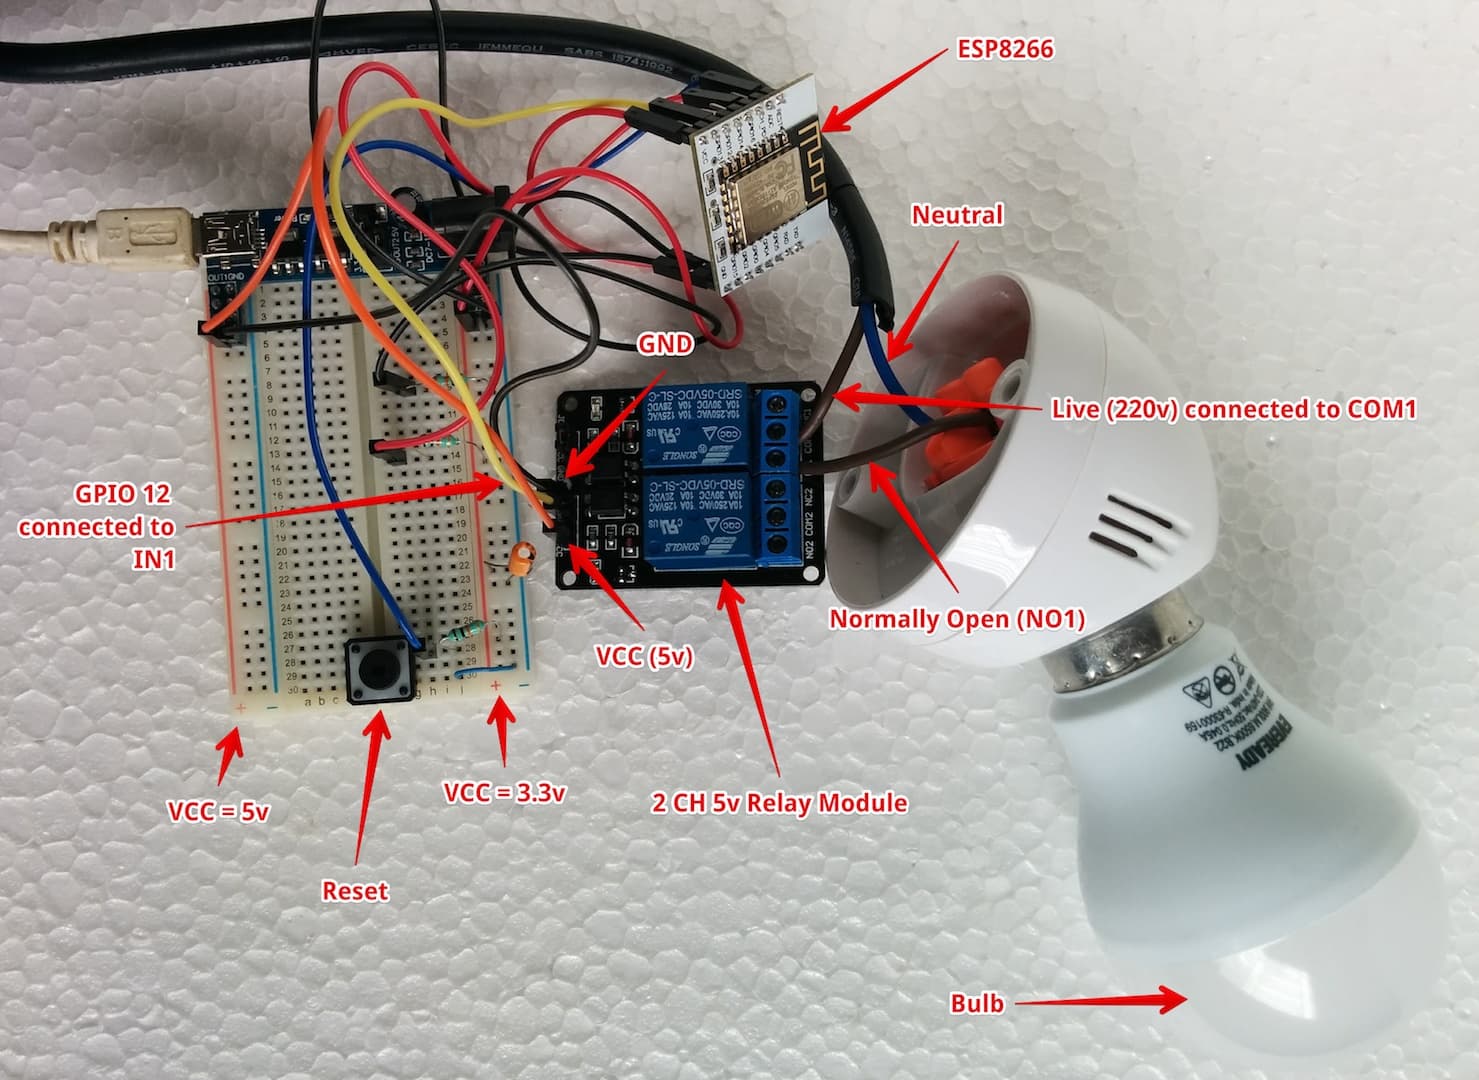
5. Build the Circuit
Connect all the components as shown in the diagram below. Bulb, used in the circuit represents any electrical devices that we want to control based on geofence event.
CAUTION: DO NOT touch any open wire or part of the circuit while main power is on. There is risk of electric shock.
Circuit Diagram:

Circuit Design:
6. Configure ESP8266 as MQTT client
a. Connect to WebREPL of ESP8266 using Chrome or Firefox browser.
b. Press Ctrl & E to enable paste mode. Paste following code and Ctrl & D to finish.
# This file is executed after boot.py
from umqtt.simple import MQTTClient
from machine import Pin
import machine
import ubinascii
import ujson

# Setup a GPIO Pin for output
bulbPin = Pin(12, Pin.OUT)

# Modify below section as required
CONFIG = {
     # Configuration details of the MQTT broker
     "MQTT_BROKER": "m20.cloudmqtt.com",
     "USER": "zvtpjsup",
     "PASSWORD": "i2vr9qcTsg5K",
     "PORT": 16766,
     "TOPIC": b"owntracks/zvtpjsup/nexus5/event",
     # unique identifier of the chip
     "CLIENT_ID": b"esp8266_" + ubinascii.hexlify(machine.unique_id())
}

# Method to act based on message received
def onMessage(topic, msg):
    jsonObj = ujson.loads(msg)
    print("Topic: %s, Message: %s" % (topic, jsonObj))

    msgType = jsonObj['_type']

    if msgType == "location":
        print("Lat: %s, Lon: %s" % (jsonObj['lat'], jsonObj['lon']))
    elif msgType == "transition" and jsonObj['desc'] == "Home":
        if jsonObj['event'] == "enter":
            print("Event --> enter")
            bulbPin.low()
        elif jsonObj['event'] == "leave":
            print("Event --> leave")
            bulbPin.high()

def listen():
    #Create an instance of MQTTClient
    client = MQTTClient(CONFIG['CLIENT_ID'], CONFIG['MQTT_BROKER'], user=CONFIG['USER'], password=CONFIG['PASSWORD'], port=CONFIG['PORT'])
    # Attach call back handler to be called on receiving messages
    client.set_callback(onMessage)
    client.connect()
    client.subscribe(CONFIG['TOPIC'])
    print("ESP8266 is Connected to %s and subscribed to %s topic" % (CONFIG['MQTT_BROKER'], CONFIG['TOPIC']))

    try:
        while True:
            client.wait_msg()
    finally:
        client.disconnect()
Note: The relay used in my circuit gets on for low output of the GPIO Pin. That is why, I have called bulbPin.low() (line #35) for the event 'enter' received from CloudMQTT and bulbPin.high() (line #38) for the event 'exit'. It may be opposite in your case.
c. Call listen() in the REPL prompt.
>>> listen()
ESP8266 is Connected to m20.cloudmqtt.com and subscribed to b'owntracks/zvtpjsup/nexus5/event' topic
d. If everything goes well, the bulb will be switched on/off for the geofence event enter/leave respectively.
>>> listen()
ESP8266 is Connected to m20.cloudmqtt.com and subscribed to b'owntracks/zvtpjsup/nexus5/event' topic
Topic: b'owntracks/zvtpjsup/nexus5/event', Message: {'lat': 22.58322, 'event': 'enter', 'tst': 1494136163, 'tid': 'n5', '_type': 'transition','desc': 'Home', 'acc': 3.9, 'wtst': 1491659872, 'lon': 88.45298, 't': 'c'}
Event --> enter
Topic: b'owntracks/zvtpjsup/nexus5/event', Message: {'lat': 22.58102, 'event': 'leave', 'tst': 1494136187, 'tid': 'n5', '_type': 'transition','desc': 'Home', 'acc': 4.374001, 'wtst': 1491659872, 'lon': 88.45328, 't': 'c'}
Event --> leave
Note: To configure ESP8266 to listen to the topic as soon as it starts, you need to append the code at the end of the main.py. It runs after the execution of boot.py. If main.py does not exist in the device, then create a new file named main.py and paste all the code. Finally, upload that file to ESP8266. Refer step #5 of my earlier post Configure STA_IF interface of ESP8266 (MycroPython firmware) to connect with WIFI network automatically on boot.


Comments